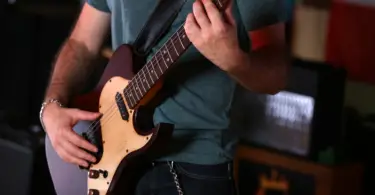
Holding the guitar neck is not as easy as we think it is, most especially for beginners. However, there are things to consider to properly learn how to hold a guitar neck with ease. Your joints and muscles will be at stake if you do not correctly hold the neck.
We will show you the step-by-step guide of learning and things related to holding the guitar’s neck, such as proper posture that is very important in preventing muscle strain and how you will adjust the guitar truss rod so it will not bend in the middle for the benefit of holding the neck flawlessly.
Quick Links
Placing your fretting hand
1. Place your fingers along the neck equal to the frets
Rest your palm on the bottom of the neck with your left hand at the end of the neck with the tuning pegs. Fold your four fingers around the neck, equal to the metal frets, and pointing to the ceiling. Have your knuckles gently curved for the most comfortable position to grasp the guitar neck.
- Using your left hand to maintain the load of the guitar can put additional pressure on your joints and muscles.
- Prevent holding your fingers at an angle when holding the guitar since it restricts your ability to move your hand.
- When you’re left-handed, grasp the neck with your right hand.
Important tip: After you wrap your fingers around the neck, slide your right index finger between your left palm and the bottom of the neck. Loosen the grip of your left hand so your palm doesn’t touch your index finger. It will allow you to stretch your hand easier.
2. Put your thumb at the back of your guitar’s neck in line with your forefinger
Push the base of your thumb softly against the back of the neck, keeping the space between the top and bottom equal. Ensure your thumb will be on the same side of the neck as your forefinger for maximum flexibility when playing.
- Do not firmly push the point of your thumb into the neck since this might create muscular tension and long-term damage.
- You won’t be able to flex your fingers to play chords if you curl your thumb over the top of the guitar neck.

3. Maintain a small bend in your wrist so that you may quickly shift hand positions
Maintain a relaxed wrist with a small bend to maintain your fingers parallel to the frets. When holding it, ensure your palm does not contact the back of the neck. Prevent bending your elbow beyond 90 degrees because it will alter the angle of your wrist and limit your mobility.
4. With the tips of your fingers, pressing down the strings
Place your finger immediately towards the side of the metal fret on the string you like to strum. As you apply pressure on the strings you wish to play with, maintain all of your knuckles gently bent. Because you won’t be able to play as clear a chord if you push down with the tips of the fingers instead of the pads, ensure you just pressing down with the tips of your fingers instead of the pads.
- If you push the string firmly on the metal fret, the song will sound blurry when played.
- Bring your thumb closer to the ground of the neck if you need to extend your fingertips further down the neck to strike a note.
5. Whenever you need to change chords, move your hand gently to the neck
When you need to adjust the postures of your arms and hands, calm them so that you can adjust them effortlessly. As you move the strings into their new position, take your finger as near the strings as possible. Bring your thumb closer to the bottom of the neck as you lengthen your fingers to access the strings you need.
- Individually playing chords will help you become accustomed to the hand position. Then, as you become more familiar with the chords, experiment with moving between them.
- Hold that string down as you shift places unless the chords you’re moving between have the same note.

6. Playing with Proper Posture
- Place the guitar’s bottom on any of your legs. The guitar’s midsection is the curving notch where the frame becomes narrower. Rest your feet firmly on the floor and sit on a chair or stool. Set the guitar neck to point to the left side and the waist to rest on your leg. Set it on your right thigh for a more relaxed playing stance. Put the guitar on your left thigh for a classical posture.
- Placing the guitar on your thighs helps to maintain the weight and relieves strain on your fretting hand, allowing you to move it around rather freely.
- Classical posture helps you to reach the upper frets without having to move your legs.
- Tighten a guitar strap, so the guitar rests at breast levels if you’re practicing while standing.
Important tip: Unless the guitar isn’t even with your chest while you lay it on your lap, use a guitarist’s footbed to lift the leg you’re sitting the instrument on.
7. Position the guitar at an angle so that the neck lifts
Maintain a perpendicular relationship between the front of the guitar and the ground, and wrap your right elbow over the front of the body to hold it in place. Next, angle the neck so that it lifts about 30 and 45 degrees, allowing you to comfortably extend your hand and access all of the frets.
- You can reach the highest frets on the guitar neck by holding the instrument at an angle.
- If you play left-handed, using your left arm to maintain the guitar frame and your right hand to grasp the neck.
8. As you play, sit up straight
Relax any stiffness in both neck and shoulders to feel stiff when playing the guitar. Instead of arching or curving your neck, sit or stand up straight and face front. Put your arms free rather than tensed so you may easily shift your fretting hand.
- Take regular breaks when playing and practicing so you may stretch. You’ll be less tense and sore as a result.
- When you play with bad posture, you risk causing long-term joint injury.

Using the Truss Rod to Straighten the Neck
1. When your guitar neck has a truss rod cover, remove it
Place the guitar down so that the strings are level. Search for a rectangular or round plastic cover around the neck’s end to connect to the body. Unscrew the cover from the neck. Put the cover away while you work to avoid losing it.
- Your guitar neck may miss a cover for the truss rod adjustments. Inspect the neck for a hole around the tuning pegs or where it links to the body.
- If there is no cover for the adjustment nut, you may have to detach the neck from the body to get to it.
2. Fasten the capos against the first and fifteenth frets
Capos are clips that keep the strings to the frets to adjust the tune. With the tuning pegs, clip the first capo to the left of the first metal fret from the tip of the neck. Make certain that it holds just about all the strings securely against the neck. Next, locate the 15th fret on your guitar’s neck and place a capo to the left of it.
- The capos maintain the strings straight, allowing you to observe how much the neck bows for either direction.
- Capos are available in the music supply shops.
3. Using a feeler gauge, measure the distance between the top string and the 7th fret
Feeler gauges are tiny metal objects used to measure the gap between the strings and the, for example, selected a 0.007 in (0.18 mm) feeler gauge, then place it on top of the 7th fret, behind the heaviest string at the top of the neck. You don’t have to change if the feeler gauge contacts the string without violently rising from the neck.
- Loosen the adjustment nut if you have to raise the string to slip the feeler gauge below it.
- Tighten the truss rod if there is a gap greater than the feeler gauge.
4. Rotate the nut counter-clockwise if the next bends up and contacts the strings
Examine the strings around the 7th fret to determine if they make contact with the neck. When they do, place an Allen wrench into the adjustments nut hole and ensure the wrench is well inserted. To straighten the neck, spin the nut counterclockwise, a half turn at a time. Assess the gap with the feeler gauge to verify if you’ve made enough adjustments.
- If you don’t lift the strings of the neck, they will vibrate when you play them.
5. Reduce the space between both the strings and the neck by rotating the nut clockwise
Alternatively, rotate the nut clockwise with your Allen wrench if the strings were further away from the neck or were over-adjusted. To avoid breaking the truss rod, make a quarter turn at a time. Once completing the adjustment, use your feeler gauge to measure the distance between the 7th fret and the top string.
- If the strings are further away from the neck, pressing down and playing notes will be more challenging.
- Strings usually play if they are 0.006–0.012 inches just above frets.
Some Final Words
When you correctly know how to hold a guitar neck, you can strum the strings with comfort and will surely enjoy playing the guitar without straining your joints and muscle.
Therefore, we hope that with this guide, you completely learn how to hold a guitar neck.


