In this article, we are going to be looking at some microphone preamplifiers, a variety of different ones, checking out noise levels, features, things like that. Mainly with the focus of powering the Shure SM7B4. This microphone is very popular. You see it used by podcasters, radio show hosts, singers, a variety of people use this microphone.
Now, that said, it is a deceptively challenging microphone to set up. It is a dynamic microphone, so it puts out a very weak audio signal when you speak into it. And it doesn’t take power, so it requires an external microphone preamplifier to amplify that signal to a level that your computer can use or your sound card you use or whatever. And a lot of people make the mistake purchasing a microphone preamplifier that isn’t quite good enough for this microphone, and it ends up being quite noisy or very low in volume.
When you buy through links on our site, we may earn an affiliate commission. As an Amazon Associate I earn from qualifying purchases.
Quick Links
Best Preamps for SM7B — Comparison Table
- Focusrite Scarlett Solo 3rd Gen USB Audio Interface, for the Guitarist, Vocalist, Podcaster or Producer — High-Fidelity, Studio Quality Recording, and All the Software You Need to Record
- Peak gain: -15db (/wo software)
- Signal to Noise: 55 db
- Includes lots of Free Audio Software
- Built-in "AIR" EQ Effect
- USB Type-C
- Cloud Microphones CL-2 Cloudlifter 2-channel Dual-Mono Version Mic Activator with 2 Senor XLR Microphone Cables
- Peak gain: overload
- Signal to Noise: 54 db
- Very High Gain
- Zoom H6 6-Track Portable Recorder, Stereo Microphones, 4 XLR/TRS Inputs, Records to SD Card, USB Audio Interface, Battery Powered, for Stereo/Multitrack Audio for Video, Podcasting, and Music
- Peak gain: -6db
- Signal to Noise: 45 db
- Software Limiter
- Four XLR Inputs
- Build-in Mics
- M-Audio M-Track MKII Two-Channel USB Audio Interface with Waves Plugins
- Peak gain: -6db
- Signal to Noise: 57 db
- Two-XLR Inputs
- 60-db gain
- Free software
- Sound Devices USBPre 2 USB Stereo Audio Interface w/ Mic + Line Inputs
- Peak gain: 0db
- Signal to Noise: 57 db
- Hardware Limiter
- Very High Gain
- Large Decibel Meter


So, in this article, I wanted to just explore some different microphone preamplifiers, compare them, and see what you should expect for a variety of different options I have in my home studio. It also is an opportunity for me to test and try out the new preamp. It is the Scarlett Solo 3rd Gen, so this is a very popular microphone preamplifier, the gen one, and gen two, but this is the third generation. I don’t know how long it’s been out, but it’s by Focusrite and it is one of the most affordable preamplifiers for the home studio. So, we’ll also check this out. And next, I guess, we’re going to do an unboxing of this, and we’re going to do a feature review of each of the preamps. And then, I’ll just throw the results up and we’ll talk about them after. Okay? Let’s get to it.
Best Preamps for SM7B Review
1. Focusrite Scarlett Solo (3rd Gen) USB Audio Interface with Pro Tools – The Best Preamp for Shure SM7B
- Peak gain: -15db (/wo software)
- Signal to Noise: 55 db
- Includes lots of Free Audio Software
- Built-in "AIR" EQ Effect
- USB Type-C
So, what comes in the box? We have the Focusrite device, and we have a cable to connect it to your computer on the back. We can just plug it into type C USB, and it plugs into your computer with a type A 2.0 port. So, some Macbook laptops might have problems, but most computers should have no problems powering this. And then, we have the XLR port on the front. This is where your microphone is going to connect to. You generally want to use an XLR cable that is as short as you need and as well-insulated, well-shielded, that way can reduce noise.
And unlike previous generations of the Focusrite5, one of the main changes that I like about this upgraded version, is that it has a gain of 56 decibels. The older versions were like 47, 53, or something like that. So, this has a higher gain, and that’s very important because the Shure SM7B, they recommend you have at least 60 decibels of gain. Probably they recommend closer to 70. So, this is actually not enough for the Shure SM7B on its own if we’re looking at the recommended requirements, but we’ll still do a test here and look at some alternatives on how to still get away with this.
2. Cloud Microphones CL-2 Cloudlifter 2-channel Dual-Mono Version Mic Activator with 2 Senor XLR Microphone Cables and Cathedral Pipes Durham
- Peak gain: overload
- Signal to Noise: 54 db
- Very High Gain
Okay, so next up we have these devices. These are also preamplifiers for microphones. They’re a little bit different than the Focusrite Scarlett and other USB preamps, however. You might notice that there are an XLR output and an XLR input, but there’s really no USB or any obvious power. Cloudlifter CL-2 has just two channels. Now, they are dependent on another device, so it’s dependent, typically, on another preamp that can provide them power through something called phantom power. And the way it works is, well let’s say we bought the Focusrite and it has 56 decibels of gain, and we have our Shure SM7B microphone and it needs 70 decibels of gain. Well, you can pick up one of these microphone preamplifiers that are in line, and you can drop it down in between. And so, now, you can connect the XLR cable from the microphone to the XLR input of the preamplifier, then you take the output of this and you feed it into the input of the USB preamplifier.
The idea here is you’re amplifying the microphone and then amplifying it again. These devices, the Cloudlifter, and the Cathedral are about 20 to 25 decibels of gain. There’s another device by sE Electronics called the DM1 Dynamite. I think that does 28 decibels of gain. Point being, though, Focusrite Scarlett Solo (3rd Gen) has an effective gain, now, of around 70 decibels, which is what the recommended gain for the Shure SM7B is. So, you can buy it and Cloud Microphones CL-2, two relatively inexpensive items, combine them, and then you can get the performance you need for the Shure SM7B.
Now, to the power of Cathedral Pipes Durham, there’s a little button here called the 48 volts. It’s a phantom powered way of powering this. So, you turn this button on when you have the cables connected, and you have like an invisible power source being provided through that cable to the device. And now, the device has an amplifier within it that will then amplify the microphone. So, it’s like a pre-preamplifier, and then we have the preamplifier, and it’s sent out to your computer over a USB. A very popular way of powering the SB7B these days.
3. Zoom H6 6-Track Portable Recorder
- Peak gain: -6db
- Signal to Noise: 45 db
- Software Limiter
- Four XLR Inputs
- Build-in Mics
Next up, we have this device. It is unique in that it is considered probably a field recorder. It has four channels for XLR input. And also, has a touchable microphone, a stereo microphone. You can put different microphones on, and I think you can also get two more XLR inputs. So, that’s kind of nice. It has a screen so you can see the gain. You can also do channel mixing, which is very unique mixing audio on a device like that. It can save to either SD card, or you can save to USB to your computer, so it acts as a mobile recording studio with batteries on the back to power it all. It does go through batteries pretty quick but well worth it. And in terms of gain, we’ll check that out. The gain on this is not super great for the SM7B, but we’ll take a closer look in a second.
4. M-Audio M-Track II – the best audio interface for Shure SM7B
- Peak gain: -6db
- Signal to Noise: 57 db
- Two-XLR Inputs
- 60-db gain
- Free software
This is a fairly old USB preamp I picked up maybe a few years ago, actually. It has two channels, so you have two XLR inputs. Not just a guitar and a mic, you can mix it up. You can have two mics, two guitars, whatever you want in that regard. And it has 60 decibels of gain per channel, which is a little bit higher than the Focusrite Scarlett 3rd Gen.
5. Sound Devices USBPre 2
- Peak gain: 0db
- Signal to Noise: 57 db
- Hardware Limiter
- Very High Gain
- Large Decibel Meter
It’s also similar to the M-Audio M-Track II in terms of basic functionality. It does have things like the mic one, mic two, so two channels. It has a dedicated line and auxiliary input, though, and you can toggle between that on the frontier. Also, you have quite a bit of gain, so unlike the M-Audio, which only goes up to around 60, this goes up to around 70 to 80 decibels of gain. So, lots and lots of headroom there. You have a very large meter in the front, LED meter, to see the game levels.
So, while the M-Audio M-Track II might have four LEDs, this has a ton. You can clearly see what level you’re setting things too. In terms of output, it has USB 3.0, so you can record to your computer with it. And it has some more traditional outputs, auxiliary out, line out. And it has some professional outputs on the back. It also has a little hidden compartment here that has some toggle switches, dip switches, and you can program that on the back here by looking at the menu. So, phantom power, you can program, and there’s a limiter functionality you can turn on.
6. Saramonic SMARTRIG
So, just having a little bit of fun. We’re also going to take a look at the Saramonic SmartRig. And so, this is a battery-powered, nine-volt, XLR preamp, and you can change the gain. It can connect to quite a few things, computers even. And one inexpensive way of powering an XLR microphone but will power the SM7B. We’ll check that out in the review.
7. Zoom H1N Portable Recorder
Now, it’s not an XLR based, so you need an adapter. So, 3.5 goes in, and then you can connect the Shure SM7B to the XLR adapter. And that will allow us to record either directly to a micro SD card on the device, or we can use USB and record to our computer that way with the device. So, it’s quite versatile, and it will work with the Shure SM7B but how well, which I will have to just check out in a moment.
8. Mackie Mixer
So, as you can tell, there are quite a few different ways to power a Shure SM7 microphone. There are hundreds of different preamps out there, so I can’t cover them all. But I did want to just touch on these two quickly. This is a Mackie mixer. It lets you plug in lots of different microphones. You also have tonation control. You can change the EQ, and you can also mix all the audio channels as needed. This particular one by Mackie does have a FireWire output, so you can connect it to your computer. Many mixers don’t have a digital output, and for that reason, I’m just going to avoid mixers in this review. And I’m going to say unless you know what you’re doing, I would recommend you avoid buying a mixer for the SM7B, although it would work.
9. dbx 286s Microphone Preamp & Channel Strip Processor
I also want to touch on this device. I just want to mention that the gain on this is around 60 decibels or so, so it is enough to power a Shure SM7B. It also has a gating function, so you can reduce the background noise with this device, which is kind of nice. I’m not a big fan of gating functions. I prefer to use software noise filters, but if you have a live audio application, this is still quite useful. And it’s rack-mounted, so it’s targeted more for professionals. And so, again, I would probably recommend you avoid buying this unless you know what you’re doing.
Best Preamp for SM7B — Test Results
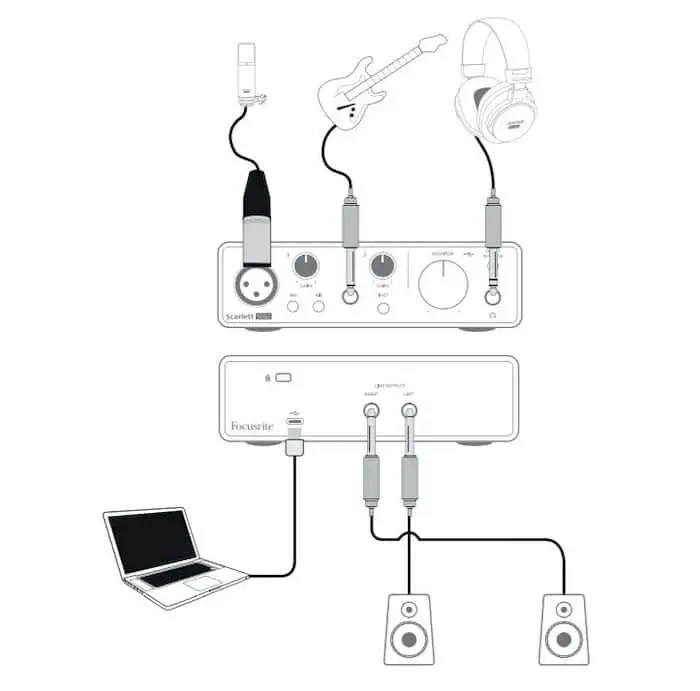
Preamp for SM7B Setup Diagram
Test Setup
So, to start off the testing, since we are looking at the quality of the preamps for the purpose of powering a Shure SM7B6, I’m going to be mainly trying to test how much gain each preamplifier offers and what the noise floor is for each preamplifier. So, in this first test, what I’m going to do is I’m going to put the microphone into a soundproof enclosure, and I’m going to then generate an audible tone with a speaker. And that tone is roughly the same volume as a human voice, and so that’s going to give us a control range for all the preamps in terms of max gain. And then, I’m going to replace the microphone with 150 ohms, kind of a dumb load, and that’s going to act as a zero signal source for the preamplifier. And that will allow us to get a good idea of what noise the preamplifier is generating without a microphone attached at that gain level.
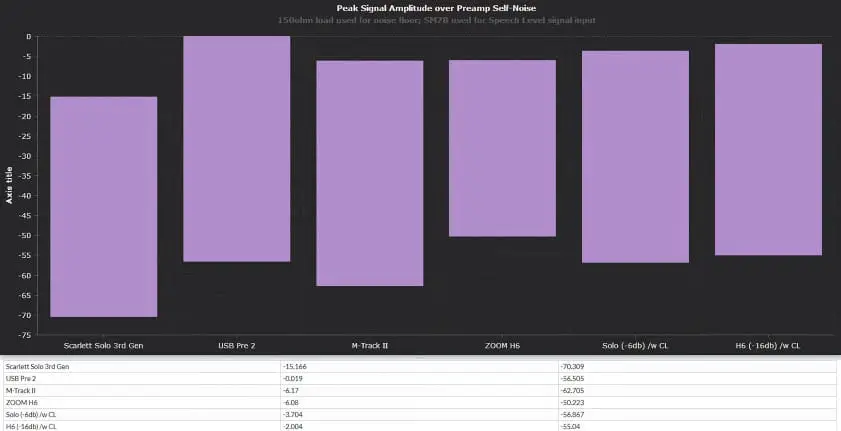
Peak Signal Amplitude over Preamp Self-Noise
Peak Signal Amplitude over Preamp Self-Noise
1. Focusrite Scarlett Solo 3rd Gen
We can see that it reaches a peak signal gain of around negative 15 decibels, and it has a noise floor of around 70, which is overall pretty good. I would point out that you generally want to record with a peak signal of around negative 12 to negative six, depending on what you’re trying to do. But very unique to the Scarlett Solo 3rd Gen, it has a software gain functionality built into it. So, I didn’t include that in this result, but if you go past a 50% record volume, it will actually kick into the software mode and it will let you increase that gain to whatever you want it to be. It doesn’t reduce the noise, but it will let you make the signal as loud as you need it and that makes the Scarlett Solo 3rd Gen very helpful if you are doing things like a Twitch Livestream where you don’t have the option of doing post-production to increase the volume. It’s built into the driver, you can easily adjust it to whatever volume and level you want.
2. Sound Devices USBPre 2
At max gain, it nearly clips the signal. It’s very high. And in terms of the noise floor, it gets negative 56 decimals as a noise floor. I’ve heard in the past that negative 60 is where you want a noise floor to be. That’s when it starts becoming inaudible. So, it’s pretty close to being perfect on that front for the Shure SM7B, but it still has a little bit of a margin of improvement, let’s call it.
3. M-Audio M-Track II
It gets very similar results to the USBPre 2, actually. The only difference is it has a little bit less gain, negative six peaks on the gain, but that is a sweet spot for my applications generally. So, the M-Track II is pretty great on that front, but if you want to increase the volume any more, you’re going to have to use post-processing or some type of audio plugin to get it all the way up to zero decibels.
4. Zoom H6 6-Track Portable Recorder
In contrast to M-Track II, we have the Zoom H6. It also achieves about the 60 decibels of gain, reaching around negative five, negative six decibels of peak signal. But as you can look at the noise floor on this guy, it gets a noise floor that is close to, what, negative 50 Db? So, it’s quite audible in terms of its noise floor and has a less dynamic range between signal and noise.
5. The Solo with the Cloudlifter
Generally, people in the past when they bought these USB-based preamplifiers, they did not have a way to increase the volume past, let’s say, negative 15, negative 20 decibels even. And that made the device very quiet. So, people would go out and buy a Cloudlifter, which would increase the gain 20 decibels, and they would attach it to your Scarlett Solo 1st Gen, let’s call it, and it would get the gain up to that negative 10 decibels, negative five decibels negative two decibels peak. And that’s where people wanted it. And so, it was able to help those early devices output a loud enough signal.
Now, the problem that I have with these Cloudlifters is if you increase the volume in software, you may not need it. And in this particular case, we see that other devices perform as well or better in terms of a noise floor. So, the Cloudlifter, in this case, is not really helping a device like the Scarlett Solo 3rd Gen reduce the noise. And if you’re using the software gain built into the third-gen, you don’t need the Cloudlifter to add any additional gain. You can do it through software. You don’t need a hardware device to do it. Anyways, It does work. I had to turn down the game six decibels on the solo because if I didn’t, it would be clipping. So, it’s actually too loud when you combine them and have them set to full gain.
6. Cloudlifter with the Zoom H6
Next, we use the Cloudlifter with the Zoom H6. The point here was not to increase the gain but to try to reduce the noise floor. The Cloudlifter, being like a pre-preamplifier, amplifies that signal, so the H6 does not need to do as much work. And by reducing the gain on the H6, we also reduce the noise that it introduces. And as a result, when we compare the Zoom H6 at full gain without the Cloudlifter to the Zoom H6 with the Cloudlifter at a reduced gain, we see that the noise floor actually dropped and we were actually able to increase the gain. So, we got a stronger, better signal. So, in this particular case, the Cloudlifter was very helpful.
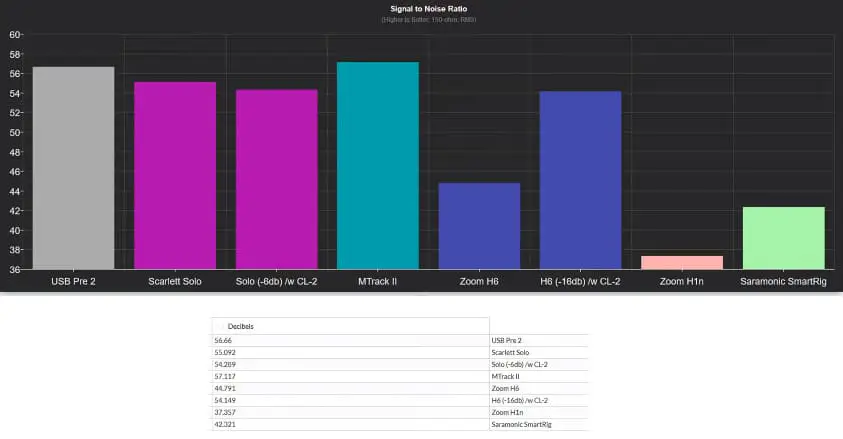
Signal to Noise Ratio
Signal to Noise Ratio
So, in this next chart, we’re looking at the signal to noise ratio of the preamplifiers. This is not looking at how much gain the preamplifiers offer. As we saw for the Focusrite Scarlett Solo 3rd Gen, the gain doesn’t really matter as much because you can change that in software. But the signal to noise ratio is probably more important. The USBPre 2 gets around 57 decibels of signal to noise ratio, which is pretty good. Around 60 decibels of signal to noise ratio, you no longer hear the noise. The Scarlett Solo at full volume, full gain gets around 55 decibels of signal to noise ratio, which is also very good. How much of a difference that is is not going to be significant? It might be audible, but it’s not significant. When we add the Cloudlifter into the Solo single chain, so the Scarlett Solo with the Cloudlifter, we see that we actually increase the amount of noise by about one decibel. So, you might not want to put one of these inline preamplifiers in with the Scarlett Solo 3rd Gen. It might actually just hurt things and increase the cost.
The M-Track II, it’s a discontinue to the device, but it has some of the best signals to noise ratio out there. It also gets 57 decibels of signal to noise ratio, but for a device that costs me not much when I purchased it, I think that is a great result. The Zoom H6, on the other hand, gets abysmal results. I would strongly recommend you not use it with the Shure SM7B because the noise will be noticeable. You can fix the noise using the software in post-processing, but generally, it’s not a good choice for the Shure SM7B.
Now, we’re going to try to fix that problem by adding a Cloudlifter to the Zoom H6, and when we do that, we actually do increase the signal to noise ratio substantially. That is largely because the Cloudlifter is doing all the upfront work by amplifying that very weak signal into something that the Zoom H6 doesn’t have to work very hard on it. And so, we can turn down the gain on the Zoom H6 by 16 decibels, and that also reduces the noise substantially. So, the Cloudlifter with the Zoom H6 makes the Zoom H6 a usable device for the Shure SM7B. It still has higher noise than the Scarlett Solo, so it’s not a very cost-effective solution, but there you go.
As I mentioned, we are also looking at the Zoom H1N. There are really bad results here. You cannot put a Cloudlifter N series with the Zoom H1N because there is no phantom-powered power available. There are no 48 volts to turn on with a Zoom H1N, so it is just a bad result. Lots of noise. The Saramonic SmartRig, which is a very portable device that you can use with your smartphone, that gets an equally bad signal to noise ratio, and so neither of those devices will let you get a clean recording with your Shure SM7B.
Verdict
When we compare the Scarlett Solo and the M-Audio M-Track II, the noise floor is between these two devices. When we listen to them, it didn’t seem that different, and that was large because the noise being introduced isn’t from the preamplifier in this case, it’s mostly from the room or from the cabling or from the microphone even. It’s getting in other places, and it is more significant than the preamplifier’s noise.
What this tells us is we don’t really need to worry about having the very best preamplifier in the home studio environment. If you had a professional studio that had isolated sound environments, things like that, you might be able to get away with justifying a very expensive preamplifier, but in your home when you have a laptop or a computer nearby, the noise being introduced is going to be more than the preamplifier. In the case of the Zoom H6, though, the preamplifiers are so poor in comparison that we actually can hear the noise being introduced from those preamplifiers. When you’re purchasing a preamplifier, though, you will also need to look at features, and each of these preamplifiers we looked at today have a different function, a different feature, and a different price range to reflect that. The M-Audio M-Track II has two channels, while the Scarlet Solo only has one microphone channel. The Zoom H6, though, has four to six channels.
Other things you need to look at when you’re buying a preamplifier are does it have a limiter? Does it have battery power? Does it have a USB output? Does it have a direct monitor? Can you listen to yourself in real-time without any latency? Does it come with free software or not? What are the user reviews like online? The M-Audio M-Track II has some of the lowest noise floors that we looked at today. However, it has a relatively low user review score online. When you turn it on, it often doesn’t like to wake up, so you might need to unplug and replug it in. It has all these little finicky issues with it, and that drags down the score. So, you can’t look at buying a preamplifier just on the quality of the preamps themselves, but it is something to keep in mind.
In terms of the Cloudlifters, I didn’t look at the Cathedral, but we looked at the Cloudlifter, which is very similar. There’s also a Dynamite DM1 preamp you can buy that’s very similar to the Cloudlifter for a little less money. Do you need to buy a Cloudlifter? Well, that’s up to you. We saw that with the Zoom H6 it made quite an improvement, reduced the noise floor quite a bit. With the Focusrite Scarlett Solo 3rd Gen didn’t make as much sense to buy a Cloudlifter for this thing. We saw that it actually increased noise by about one decibel with being connected to it, and with the software driver gain functionality that allows you to increase the gain past the 56 decibels that it does at the hardware level to whatever you want, you don’t need a Cloudlifter to add that extra recording gain. It does it through software.
And at the price point, The Focusrite Scarlett Solo 3rd Gen seems to be a great entry-level preamp for those buying a Shure SM7B. It’s not perfect. It still comes up short, in my opinion, for professional applications, but for the average at-home recording artist, it will be more than adequate. I would say you probably do not need to buy a Cloudlifter for that device, and it’s definitely worthy of consideration. There are other devices out there that offer cleaner preamps, but unless you’re in a studio, you probably will not be able to appreciate that functionality.
- https://mpe.berklee.edu/documents/studio/manuals/microphone/Shure%20SM7b/Shure%20SM7b.pdf
- https://fael-downloads-prod.focusrite.com/customer/prod/s3fs-public/downloads/Scarlett%20Solo%203rd%20Gen%20User%20Guide_EN.pdf
- http://it.emory.edu/studentdigitallife/documents/MARCS/SM7B_guide_en-US.pdf
- https://mpe.berklee.edu/documents/studio/manuals/microphone/Shure%20SM7b/Shure%20SM7b.pdf
- https://fael-downloads-prod.focusrite.com/customer/prod/s3fs-public/downloads/Scarlett%20Solo%203rd%20Gen%20User%20Guide_EN.pdf
- http://it.emory.edu/studentdigitallife/documents/MARCS/SM7B_guide_en-US.pdf


