There are countless variables to have in mind when trying to achieve a certain tone. The problem is that, unfortunately, most guitar players can’t constantly afford the new gear and are limited to the tones achievable with their equipment.
Amplifiers are a good example of tone-defining gear. A good amplifier can make the crappiest of guitars sound great, but it can be more expensive than a high-end guitar. We’ve probably all been to a music store and fell in love with the tonal possibilities of a certain amp, only to find out it costs an arm and a leg.
But what if you could get an entire store’s worth of amplifiers inside a single, compact, pedal? Better yet, what if being able to alternate between vintage and modern tones didn’t have to cost your life savings?
Cabinet simulator pedals5 emulate dozens of different amplifiers and provide several effects that will expand the tonal range of any guitar player. In this article, I’m going to review some of the best cabinet simulators out there.
When you buy through links on our site, we may earn an affiliate commission. As an Amazon Associate I earn from qualifying purchases.
Quick Links
Best Cabinet Simulator Pedal — Comparison Table
- MOOER Radar Guitar Speaker CAB Simulator
- Wide range of simulations
- Small and compact
- Customizable through software
- Digitech Dual Speaker Cabinet Emulator Pedal (CabDryVR-U)
- Can be used with guitar or bass
- 12-string guitar emulation
- High-fidelity emulations
- Two Notes Torpedo C.A.B. Meters Speaker Simulator Pedal
- Customizable via software
- Can be used as a preamp
- Venue emulation
- ADA GCS-5 Guitar Cabinet Simulator
- Great British and American presets
- Compact and high-quality material
- AMT Electronics Chameleon Cab Speaker Cabinet Simulator Pedal
- Emulates different size cabinets
- Simple and easy to use
- Great tone
➡ 30 speaker cabinet models
➡ Up to 36 user presets
➡ Headphone and line out

➡ 14 cabinet models
➡ Dual input
➡ Vacuum-style footswitch

➡ 32 cabinet models
➡ Eight power amplifiers
➡ Eight rooms

➡ All-steel enclosure
➡ XLR output
➡ Level Control

➡ Simulates small and thick cabinets
➡ Can be connected directly into a computer or DAW
Best Cabinet Simulator Pedal Review
1. MOOER Radar Guitar Speaker CAB Simulator — Best Cab Simulator Pedal
- Wide range of simulations
- Small and compact
- Customizable through software
➡ 30 speaker cabinet models
➡ Up to 36 user presets
➡ Headphone and line out
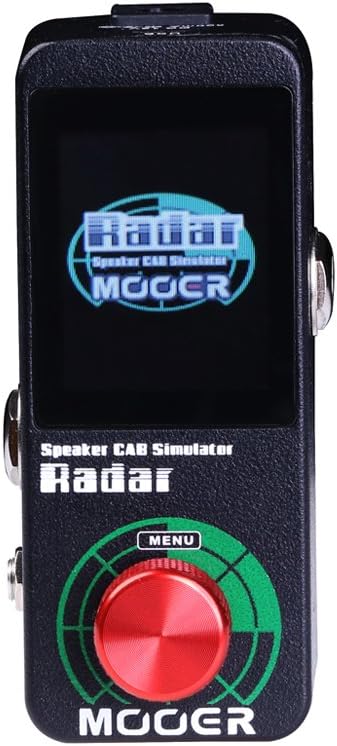
The MOOER Radar immediately draws attention with its LCD panel, something uncommon in a guitar pedal. It’s small and relatively simple, yet that shouldn’t fool you — this pedal houses 30 speaker cabinet models and has the storage space for up to 36 user presets.
The tonality range of this pedal is very impressive. You can get everything from a vintage sound to a more modern, effect heavy crunch. If the presets aren’t enough, the Radar software allows you to install custom cabinets for a more personalized experience.
When playing with this pedal, you almost forget that you’re using a pedal and not the actual amplifier you’re simulating. The sound quality is superb, and it truly feels like the real thing.
It’s small, it has a wide range of effects, and it’s easy to use and is probably one of the better buys if you’re looking for a complete cabinet simulator pedal6.
Is this pedal battery powered?
No, this pedal is powered by a 12-volt power adapter that comes included.
Will the pedal software work on a MacBook?
Yes, it will. You can find the downloadable software on the manufacturer’s website.
Who this is for?
Someone looking for a compact pedal with a wide range of simulations and the possibility of further customizing it.
Why I like it?
The MOOER Radar offers a lot for such a small package and will fit any setup.
2. DigiTech CabDryVR Dual Cabinet Simulator Pedal Bundle
- Can be used with guitar or bass
- 12-string guitar emulation
- High-fidelity emulations
➡ 14 cabinet models
➡ Dual input
➡ Vacuum-style footswitch
The DigiTech CabDryVR is a stylish pedal that offers some cabinet variety for both guitar and bass. There is a total of 14 cabinet emulations in this pedal, but you might be disappointed to find that it’s an even split between guitar and bass cabinets.
If you are a musician that wouldn’t mind having cabinet emulation for both instruments, then this is a great purchase. If, however, you are looking for a pedal that offers a wide variety of emulations just for the guitar, then you should probably consider another pedal.
This pedal is also good if you usually play on alternate tunings but don’t like having to constantly retune your guitar. Dropping an octave or two is very simple with this pedal. The DigiTech CabDryVR also allows for a 12-string guitar emulation, which is cool if you like its sound but don’t have the real deal.
The not-so-good thing about this pedal is the low-end. This pedal has a tendency to sound muddy when under heavy distortion.
Does this pedal come with a power supply?
Yes, it does.
Can you drop a single string with this pedal?
No, every string drops when using that effect.
Who this is for?
Someone looking for a pedal that works for both guitar and bass or who constantly plays in dropped tunings.
Why I like it?
The CabDryVR offers enough versatility for studio players who use different instruments.
3. Two Notes Torpedo C.A.B. Meters Speaker Simulator
- Customizable via software
- Can be used as a preamp
- Venue emulation
➡ 32 cabinet models
➡ Eight power amplifiers
➡ Eight rooms
Just like the MOOER Radar, the Two Notes Torpedo is a cabinet simulator that can also be customized via the manufacturer’s software. This fact alone is enough to justify its purchase, but besides offering total tonal control, there are also 32 cabinet presets that sound great right out of the box.
The Torpedo can be used as a preamp or with a preamp. It’s a versatile pedal that can fit anywhere in the mix.
This pedal allows the guitar to shine with its true tone but through several different types of amplifiers. Besides the cabinet emulation, this pedal also allows musicians to choose several different stage settings. It’s possible to emulate big concerto rooms or smaller venues with satisfactory accuracy.
Just like the DigiTech CabDryVR, this pedal can also be used with both guitar and bass.
Who this is for?
Someone looking for a customizable pedal.
Why I like it?
The Torpedo allows for plenty of customization and sounds really good.
4. ADA GCS-5 Guitar Cabinet Simulator
- Great British and American presets
- Compact and high-quality material
➡ All-steel enclosure
➡ XLR output
➡ Level Control
The ADA GCS-5 isn’t a shiny pedal nor has several distinctive features. However, what it does it does well.
This steel pedal allows players to emulate vintage and modern American and British cabinets. Other than choosing between the size and whether it is a sealed or an open back amplifier, there aren’t many settings to fiddle around with.
The lack of options means that this pedal isn’t appropriate for people who are looking for a wide variety of tones7. However, if these settings are something you’re familiar with and enjoy the tone, then it’s nice to have them in a compact pedal.
Does this pedal come with a power supply?
Yes, it does. This pedal uses a 9v-200mA power adapter.
Who this is for?
Someone who enjoys vintage and modern presets and isn’t looking for versatility.
Why I like it?
Although it has little variety, the ADA GCS-5 offers excellent tone in both vintage and modern.
5. AMT Electronics Chameleon Cab Speaker
- Emulates different size cabinets
- Simple and easy to use
- Great tone
➡ Simulates small and thick cabinets
➡ Can be connected directly into a computer or DAW
The AMT Chameleon is another pedal that doesn’t overcomplicate things. There is no LCD screen nor dozens of presets, and they’re definitely isn’t any computer software to customize anything. This pedal only has four knobs, and they’re enough to give you great cabinet emulation.
With this pedal, it’s possible to emulate small cabinets, with their tinnier sound and larger cabinets, with a thicker and heavier sound. There’s also a magnet knob that controls the cutoff frequency of the speakers and a positioning knob that controls the position of the simulated microphone.
It’s a compact package that packs a big punch. If you’re looking for something that works and that gives you high-quality audio, then the AMT Chameleon is an excellent option.
Who this is for?
Someone who wants the possibility of emulating a cabinet.
Why I like it?
The AMT Electronics Chameleon packs a big punch for its size.
Wrapping Up
If you don’t have an actual cabinet that you’re happy with, a cabinet simulator pedal8 offers you several different cabinets to fiddle around with.
I found the MOOER Radar Guitar Speaker CAB Simulator to be the best cabinet simulator overall. Besides being small and offering a wide range of presets straight out of the box, the MOOER Radar also allows you to customize the presets via software.
If you’re looking for more than a cabinet simulator pedal, the DigiTech CabDryVR Dual Cabinet Simulator Pedal is a pedal that allows players to easily drop their tuning without having to retune the guitar.
In all honesty, I would definitely recommend any of the pedals on my list. They all have their use cases and are a great addition to any setup. Keep rocking on!
Best Cab Simulator Pedal — Buyer’s Guide
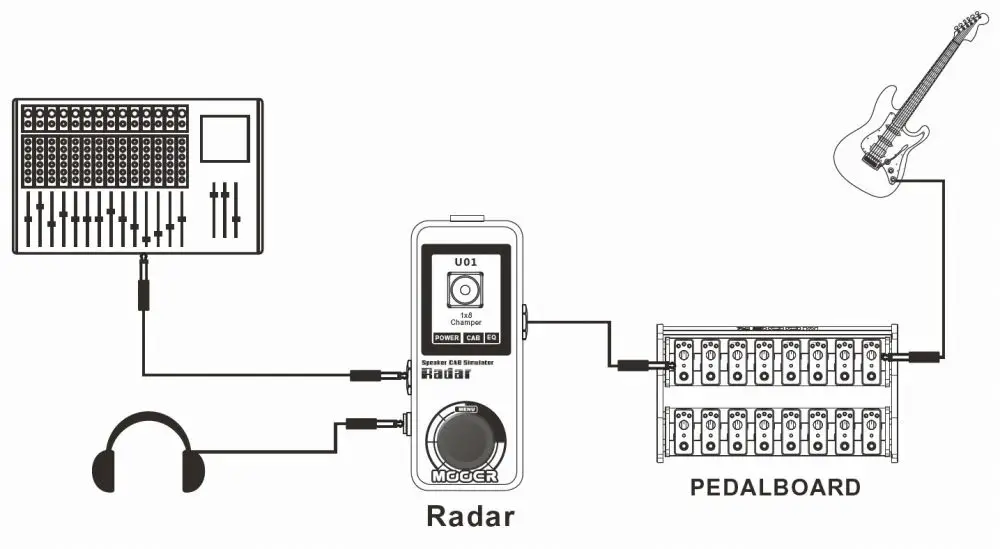
Cabinet Simulator Pedal Scheme
Five things that you probably didn’t know about your Mooer Radar Impulse Response loader pedal.
Today I’d like to talk to you about this cool little teeny tiny little box that I picked up a few months ago. I think a lot of people will pick one of these up this year. This is the Mooer Radar Impulse Response loader. This is just, I have tons of pedals. I’ve owned tons and tons of pedals and boxes and different kinds of things that were supposed to allow you to not have to use a speaker cabinet over the years, old crap from the nineties, Sonos amp type technology, and everything. And I was very skeptical. I am a hardcore tube amp guy.
I’ve got some serious boutique crap and I have vintage cabinets and all kinds of stuff all around this place. And so when somebody says, “We are going to create technology and you can get rid of all that and put it in this thing.” I’m like, I don’t know about that. But anyhow, I thought, well what the hell? I would try it out. And I did get a little acclimated to the IR thing because I got the Two Notes software and I was using it through Reaper and so I became a little bit of a believer. I’m like, ah, this isn’t too bad. This has some potential. Anyways, I ended up getting Mooer Radar pedal and was kind of disappointed with it for a while until I made a few changes. That finally discovered a few things, which I’m going to talk about in today’s article.
There are five things. Most you guys probably don’t know or don’t realize how important they are to making this thing sound awesome. Because I went from eh, on it, to a little better, a little better, a little better. And I’ll explain it to here in a second.
1. Plug it in your computer and run the firmware update.
First of all, I am one of these people, I have no patience at all. I get a piece of gear, the first thing you just want to plug it in. Just start playing, so that’s what I did. First thing I got to Mooer radar, the first thing I did is I plugged it into my amps with my load box and started turning all the little settings in it and everything. And like I said, I was very eh on it. Well, something that I did not realize that you must do is first and before you plug it in. Even though, even if you’re as impulsive of a maniac as I am, please plug it into your computer first with the little, get a little USB cable, you plug it in, and run the firmware update. World of difference.
I went from going eh, and then putting it away for a while to going, you know what? I should run that firmware, I wonder if that would do anything? I ran the firmware update. It was like, holy crap. Huge difference in the sound. Great improvement. But still, I was kind of eh on it. I’m going to give you a little bit more stuff about it here.
2. Turn off the power amps.
And the other thing, number two, is to turn off the power amps. I’ve played around those power amps over and over and over and over, turning them on, turning them off, changing all the settings around. And quite frankly, I just think they are just, they detract more than they, way more than they add.
You’re better off, even if you’re not using a power amp, if you’re using one of the Mooer preamp pedals or something like that, just forget it. Don’t even mess with that. You’re just going to frustrate yourself. I’ve tried them all, in many, many combinations. I’ve spent hours, fiddled, farting around with the darn thing. And I just could not, I couldn’t get anything with it. I would tell you, forget the power amp thing unless there’s some update with that, that they are really able to do something with it. It’s just not necessary. It’s not necessary. Once you get this thing working right, you’re going to be totally happy with it.
3. Get the best sound that you can without touching the EQ first.
Number three, get the best sound that you can without touching the EQ first. In other words, select a cabinet and move the microphones, it allows you to move microphones around. Get the best sound that you can before you start messing around with the EQs. Again, it’s a kind thing where you’ll confuse yourself, so get as close as you can and then maybe pop an EQ on to make a little tweak. If you’re trying to overcompensate and really kind of get the sound with the EQ, then refer to the other items on the list here.
Oh yeah. Now here’s something that I did with mine. I ended up just globally doing this with my system here. My interface comes with a really kind of cool onscreen mixer. It’s a Tascam. Yours will work the same way. And there’s EQ on each channel. Just to my ears, and I would just make the suggestion to you, is pull down, a notch down, 450 Hertz. Just pull down 450 Hertz. Just that’s the only EQ I have on this thing. It’s not really adding it. It’s actually just taking out a little 450. You could do it on the Mooer, the EQ is plenty. But I found that every preset I played with, I was reaching for that 450 to pull it down. I’m like, well just turn off the EQ and just pull it down on here.
If you’re using it with a mixer or something, just find your 450 or somewhere around there and pull that down and it’s just unless you like that big kind of thick uber creamy kind of low mid, low mud type sound that Sweet Child of Mine type fuzzy thick kind of thing. Unless you’re absolutely in love with that sort of thing, I think for the most part 450, just notch that down a bit to taste and just leave that on globally and it makes, I just found that no matter what cabinet I used, in fact, these are, I’m not even using, I bought a bunch of IRs off of OwnHammer and I haven’t even used them yet because once I got this thing working the way I wanted to, I’m actually loving. I’ve just been using this one rectifier 412 and everything’s, all my guitars, whatever I plug into it sounds freaking awesome.
4. Cut 450 Hz in your EQ
Now, this was the thing that was really tripping me up and I suspect that some of the people that are using Mooer Radar may be having some of the problems. Check your settings in your DAW, in your computer system and check to make sure that your interface is current because it may not be giving you all the digital audio information. What happened to me was in the process of having this thing and messing around with it, the interface that I was using, I just got to a point where I had to switch it first for reasons I won’t get into here, but I just, it got to a point where I have to switch my interface. I can no longer use the interface I was using. It was pretty old, the early 2000s, so I switched.
I got an interface that’s just very, very current, made within the last couple of years, and oh my God. Just that completely turned the whole thing around to where I had the, I got rid of the power amps, I got rid of the confusion with using the EQ. I got the 450 out of there and with the great interface that’s really transferring all the information, all the audio information, it sounds like an amp. It really, I’m just, I can’t, I’m completely blown away because I was so married to this heavy, hot, hard to service type gear, is now all in this little thing. It’s really blowing my mind.
If some of the people out there that were criticizing this thing, you might want to look at your settings and make sure that you have whatever’s going on with your workstation, with your interface, that everything is current.
5. If your interphase has a specific connector, use it that would sound better
And as a bonus, if your interface has a specific connector for the instrument, that will sound even better. It’s going to sound even richer and fuller and more like what you want to hear when you’re playing through an app.
Those are my five-plus bonus, things you may not know or may not realize about the Mooer Radar. If you want that great amp tone that you can play at a whisper, you can get a great sound directly into your workstation for recording, for practice, whatever, with no fuss, no muss. Then you must get, I would highly recommend that you get this Mooer Radar and follow the tips that I just outlined.
- https://3e7777c294b9bcaa5486-bc95634e606bab3d0a267a5a7901c44d.ssl.cf2.rackcdn.com/product_documents/documents/5487_1502811194/CabDryVR_Manual_5081772-B_original.pdf
- https://en.wikipedia.org/wiki/Effects_unit
- https://people.clarkson.edu/~brownmd/comm341/topical/effects/effects.html
- https://digitalcommons.calpoly.edu/cgi/viewcontent.cgi?article=1451&context=eesp

