A new bass bridge can breathe some new life onto your bass. Although it might not make a major difference, a new bridge can increase the sustain, the tuning stability, and it might even enhance the overall tone of your bass.
Installing a new bridge can also dramatically shift your instrument’s weight (whether you would like to make it heavier or lighter) and change its appearance. In this article, I am going to review some of the most popular replacement bass bridges.
Bass players have long debated how exactly a new bass bridge changes the tonality of the bass. There’s no consensus: some claim to be able to hear the differences, while others say that they’re just listening to a placebo effect.
The truth is that it might be difficult to spot the tonality impacts of a changed bridge while doing a blind test. More importantly, it’s almost impossible to notice a different bridge in an actual instrumental mix.
Still, there are still plenty of valid reasons to upgrade your bass bridge, such as the ones we have mentioned above. It can make your instrument lighter, more visually appealing, and increase its tuning stability.
Also, this hard-to-spot difference is only hard to spot on the more expensive basses. Cheaper instruments have low-quality bridges4, and an upgrade will definitely be noticeable.
When you buy through links on our site, we may earn an affiliate commission. As an Amazon Associate I earn from qualifying purchases.
Quick Links
Best Bass Bridge — Comparison Table
- Hipshot KickAss High-mass Bass Bridge for 5-bolt Fender, Chrome
- Extremely well built
- Fully adjustable saddles
- Increased sustain
- Fender HiMass 4-String Bass Bridge Assembly with Zinc Saddles - Chrome
- Makes no unnecessary tone changes
- Fender quality
- Very sturdy
- Hipshot Brass A-Style Bass Bridge Mount 1 - No String Through Chrome
- Killer looks
- Increased brightness
- Increased string-spacing range
- Gotoh Vintage Style Bass Guitar Bridge (4-String) Nickel
- Very cheap
- Works as you would expect
- Babicz 4-String Bass Bridge Chrome, Original Series (FCH4CHP)
- Increased sustain
- Easy to install
- Increased action set up precision

➡ Chrome Finish
➡ Fits 5-bolt Fender
➡ High Mass Bridge

➡ 4-screw mount
➡ High Mass bridge
➡ .75” string spacing

➡ A-style bridge
➡ Retrofits 5-hole mount for 4-string basses
➡ .75” string spacing

➡ Direct replacement for Fender basses
➡ Mounting screws included
➡ Precision made

➡ Fits 5-bolt Fender
➡ For normal and left-handed basses
➡ Fully adjustable
Best Bass Bridge Review
1. Hipshot KickAss High-mass Bass Bridge for 5-bolt Fender — Best Bass Guitar Bridge
- Extremely well built
- Fully adjustable saddles
- Increased sustain
➡ Chrome Finish
➡ Fits 5-bolt Fender
➡ High Mass Bridge
The Hipshot KickAss is one of the most popular bass bridge replacements. It’s definitely an upgrade over most Fender bridges since it’s more adjustable and offers more control than the stock Fender bass bridge.
This bridge is solid and extremely well built. It might make your instrument a bit heavier, but the added weight will increase the overall sustain of the bass. There’s also a slight improvement to the tone: a heavier bass and a punchier high-end.
Installing the Hipshot KickAss is very simple. The saddles are fully adjustable, and the string spacing can be dealt with without any issue. The bridge rarely, if ever, goes out of tune.
Does this fit a Fender Jazz Bass?
Yes, it does.
Who this is for?
Someone looking for a reliable bridge upgrade.
Why I like it?
The Hipshot KickAss improves on everything the Fender bridges do and then some.
2. Fender HiMass 4-String Bass Bridge Assembly with Zinc Saddles — Best Bridge for Fender Jazz Bass
- Makes no unnecessary tone changes
- Fender quality
- Very sturdy
➡ 4-screw mount
➡ High Mass bridge
➡ .75” string spacing
Fender knows what it does when it comes to instruments. This bridge is a direct upgrade to most of their basses. Besides its good looks, the Fender HiMass bridge offers increased sustain and stability.
Tone-wise there is no difference to the standard Fender bridge. Fender is not looking to change its classic tone but to offer a sturdier bridge for the more demanding players.
As with most high mass bridges, this bridge will make each string resonate throughout the entirety of the body. Installing it is as easy as unscrewing the old bridge and screwing on this one. The intonation comes pre-set, but it might be necessary to set the string height.
Is this an authentic Fender product?
Yes, it is. It comes with a Fender certificate of authenticity.
Who this is for?
Someone looking to keep the tonality profile of their instrument the same while getting a sturdier bridge.
Why I like it?
Fender knows what it’s doing when it comes to guitar hardware and this bridge is proof of it.
3. Hipshot Brass A-Style Bass Bridge Mount 1 – No String Through — Best Jazz Bass Bridge
- Killer looks
- Increased brightness
- Increased string-spacing range
➡ A-style bridge
➡ Retrofits 5-hole mount for 4-string basses
➡ .75” string spacing
The Hipshot A-Style bridge is an extremely good-looking bridge that increases the string spacing possibility over a regular bridge. This bridge has an extra 1.5mm on the sides so players can fine-tune their spacing.
Sound-wise this brass bridge increases sustain and brighten up the sound. The stability is what you would expect from a premium bridge: there are no tonality or intonation changes when using the Hipshot bridge.
Installing this bridge is also very simple, and everything needed to install this bridge comes in the package.
Who this is for?
Someone looking to brighten up their sound.
Why I like it?
This bridge is one of the better-looking bridges out there.
4. Gotoh Vintage Style Bass Guitar Bridge (4-String) Nickel — Best P-Bass Bridge
- Very cheap
- Works as you would expect
➡ Direct replacement for Fender basses
➡ Mounting screws included
➡ Precision made
This should be the go-to bridge when you’re looking for a replacement budget bridge. The Gotoh Vintage bridge does nothing out of the ordinary, but you shouldn’t expect so from its price.
What it does, however, is everything a bridge is supposed to do without breaking the bank. It’s cheap; it’s a bridge, it works. If you’re on a budget, then this bridge will keep your strings correctly spaced and in-tune. It’s easy to install, and it’s cheap. What could go wrong?
Who this is for?
Someone on a budget who needs a bridge replacement.
Why I like it?
It’s cheap, and it works.
5. Babicz 4-String Bass Bridge — Best Bass Bridge for Jazz Bass
- Increased sustain
- Easy to install
- Increased action set up precision
➡ Fits 5-bolt Fender
➡ For normal and left-handed basses
➡ Fully adjustable
Babicz makes no hard to believe claims regarding this bass bridge. There are no magical tonality improvements nor big weight differences. What there is, however, is a big stability improvement over the standard bass bridge.
While the tone remains pretty much the same pre and post bridge replacement, there is definitely more sustain. After the bridge is installed, the resonance can be felt throughout the entirety of the bass guitar5.
Setting the action with this bridge is more straightforward than setting it in a traditional bridge. Besides being easier, the Babicz bridge also offers increased action precision. This bridge comes with all the necessary tools for assembly.
Will this bridge work on a MusicMan Stingray?
No. This bridge is not adequate for a Stingray. It is possible to install it, but you will have to drill extra holes.
Who this is for?
Someone looking for an easy to install a bridge that offers increased action-setting precision.
Why I like it?
The Babicz bridge offers more stability than a standard bass bridge.
Wrapping Up
Despite your opinion on the matter, bass players are always going to keep arguing about the tonality difference in high and low mass bridges. Some notice it, some don’t, some claim it doesn’t exist.
However you look at it, and regardless if you believe in the tonality impact of a bridge, the fact is that there are bridges that are upgrades over the standard bass bridge. The Hipshot KickAss High-mass Bass Bridge for 5-bolt Fender is a great example of such a bridge, it does everything better than a regular bridge and looks better as well.
The rest is up to preference. Looks are very important when it comes to bridges. The install difficulty should also be considered. Rest assured that every bridge in my list is easy to install. Rock on!
Best Bass Bridge — FAQ
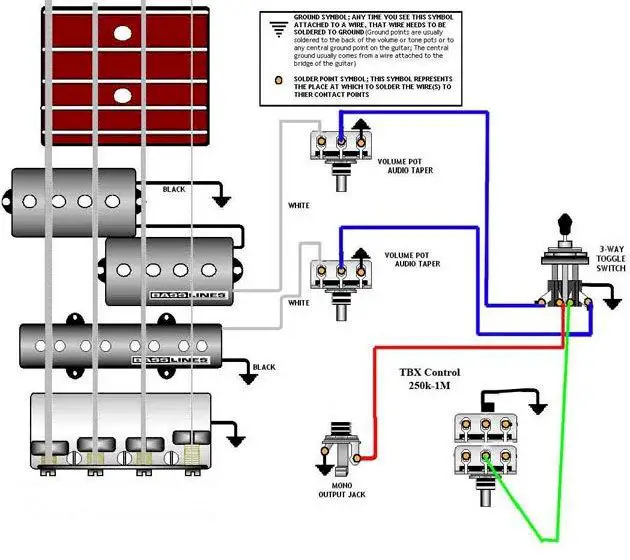
Jazz Bass Bridge Special Wiring Diagram
How to install a Fender bass bridge?
Let’s take a look at the steps of installing a base bridge on a new Fender P or a Jazz Bass body.
What are the tools that we’ll need for this? Well, this is a simple installation. All we need is a Phillips head screwdriver, wire cutters, a little wax, possibly a wire stripper, and some screws here.
Step 1.
The first thing to remember about putting a base on any instrument … any Fender instrument, anyway, is that you need to ground the bridge to the rest of the electronics, otherwise you’ll get a hum. The first thing I would do… You take the end of the insulation off, and put it through the hole that’s already here in the body, and bring it through to the control cavity. Now, what you’re going to want to do is leave the wire on the body so that when you put the bridge on, it will make contact. That way when the strings go through the bridge, they’ll be contacted to the ground and the rest of the electronics. You don’t have to fasten that down or lock it down in any way. It’s going to be locked down when you install the bridge.
Here’s a little trick that I’ve learned over the years. You really need to kind of start screw holes, so you can see where they are, and also that you don’t inadvertently crack the paint when you start putting the screws in. What I do is I take the Phillips head, and I just kind of use it to open up the hole where the screw’s going to go. I want to make sure we’re not doing that to the holes for the strings.
The larger holes are where the strings go through the body on this, and the smaller holes are where the screws go to hold the bridge on. I just do that, and it countersinks the pain a little so that you won’t have any problem getting the screw into it.
Step 2.
Now, I’m going to put the bridge. It’s going to sit a little proud because of the wire, but don’t worry about that. Then all I need to do is put a little bit of wax on the screw. Normally I’ll start all the screws before I start putting the bridge in. And you definitely want to do this by hand and not use a drill.
I wouldn’t use a drill. It could very easily go wrong. I’ll get these started first that, this way you can also kind of align the bridge as you’re tightening it down. Sometimes the bridge will become uneven if you tighten the screws and unevenly, and I’ll show you as we go along.
Now, generally what I’ll do is take the center screw all the way down because that’ll help center the whole bridge. The screw and the bridge are countersunk, so they should fit together really well, and they’ll be nice and snug, and the screw will be relatively flushed at the top of the bridge base. You’ll see after the bridge all tightened down that this wire is grounded well against the bridge base. And it looks like the base is fairly flat against.
Step 3.
So, we’ve got that. The next thing that we would do is ground wire to one of the pots. I like to leave a pretty long lead so that if you have to do something to change electronics, you can pull it out and away from the body.
Now, does it matter which pot you solder that too, or is it just basically either one will be grounded? I generally solder to the pot closest to the output. In some of the old instruments I’ve seen, they actually grounded it to the output, which would be okay too. But any of the pots… I just strip the end, solder it on, and you’re good to go.
How to install a bridge on the Fender Jazz Bass?
We’re going to do a different type of bridge on Jazz Bass6. It is called a high mass bridge. It’s got more mass at the back of the bridge. It gives a bit more sustain, and it’s kind of more like a modern style bridge.
But the overall process is the same. I’m going to take my screwdriver and use this to countersink the screw holes. That’ll help keep the paint from chipping as we’re putting the screws in. Then I prepared another ground wire that’s going to go through. You just want to spread out the wire where the bridge is going to touch it, and that’ll allow this to have a contact for the ground. Again, I’m going to use a little bit of wax to get the screws started. I’ll put all three in first.
And then as I did on the P Bass, I’m going to tighten the center screw first. That’ll get it in a good spot to make sure it’s aligned with the other screw holes. It’s a little bit of work, but it’s better to do it by hand. And there you have it.